For the purpose of this tutorial on how to download Google Chrome OS (and how to install it), we are going to use the “Flow” Chromium OS build from Hexxeh.
Download Google Chrome OS
Click here to download it now!Thanks to Hexxeh, who tweaked the Google Chrome OS source code, the OS can be easily installed from a 2 or 4GB flash drive in a matter of minutes. Users simply need to create a bootable flash drive with the Google Chrome OS image on their current operating system. Instructions are going to be listed for users running a version of Windows, however on the Flow homepage there are more complete instructions for Mac and Linux distro users.
After you download Google Chrome OS, back up any important files on the related flash drive. The drive will be formatted and all files will be wiped clean (you have been warned).First we begin by downloading all important files for the operation.
Step 1: Navigate to the Vanilla Chromium Build homepage and scroll all the way to the top of the version listing (latest build version).
Step 2: Click on the “Download USB Image (picture of a USB drive)” and the zipped OS image file should begin downloading. The file is 200MB+ and should take a while so go relax and come back in about 15-20 minutes.
Step 3: Once the Chromium OS image has completed downloading, we will also need to download the Windows Image Writer so that we can successfully create a bootable image on our flash drive. The Image Writer page can be found here, with the download link on the right hand side of the page (first green tab). This download won’t take long (less than 1 minute on high speed internet) so you might as well just wait until it’s done.
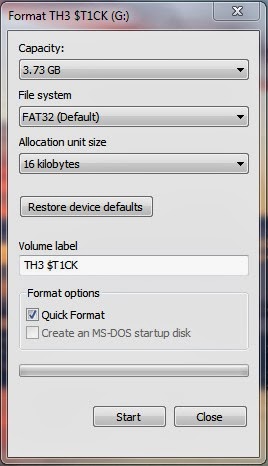
Step 4: Once everything has finished downloading we must format our flash drive. Simply insert the drive into a USB slot in your computer and wait for Windows to mount the drive. Then navigate to “Computer”, right click on the flash drive in the device list and select “format…”. The format menu will open, just click the “Start” button and Windows will automatically format your flash drive.
Step 5: Unzip the Image Writer file and open the Win32DiskImager program (Windows Vista, 7 and x64 bit users will need to right click and select the “Run as administrator” option). An error may, or may not, pop up when the program is starting. It’s referring to a floppy drive that is not installed on your machine, dismiss the error by selecting “Ok”.
Step 6: Unzip the Chrome OS .tar.gz image file you downloaded by using WinRAR or 7Zip and make sure the extracted files are in an easily navigable directory.Step 7: In the Image Writer menu select the correct drive letter of your inserted flash drive. This can be checked easily by opening “Computer” or “My Computer”. Once the correct drive is selected, you must then select the blue folder icon and navigate to the Google Chrome OS image file in the browser window that pops up. If you have successfully selected the correct image it will show up in the address bar to the left of the open source icon.
Step 8: Double check the drive letter of your flash drive and then select “Write” after making sure. A warning will pop up indicating your drive may malfunction if you happen to select the wrong one, dismiss the warning message and the program should begin writing a bootable image to your flash drive.
Step 9: When the program has finished writing the image and displays “Done” in the bottom left corner you may then remove the flash drive and close the program.
Step 10: Reboot the machine and choose the USB thumb drive you just created as the boot partition. The computer will then boot into the Google Chrome OS Flow build.
Step 11: The first time you login into the OS you will need to login using a common login name and password. The Login screen looks like the image at the top left, with the Google Chrome and Flow logos clearly evident.
Login: facepunch
Pass: facepunchAfter the OS has started up simply login to a Gmail or email account. After you have successfully logged in, reboot the computer (press power off) and complete the steps again to boot into the Google Chrome OS. You should then be able to login to the OS using your Gmail account and password once it boots up. Netbook users are less fortunate, there is currently a bug preventing login – so just login using the “facepunch” info. All personal account information will be stored however so you won’t have to keep logging in after reboots.

Congratulations, now you know where to download Google Chrome OS and how to install it!After you have completed installation and played around with the new Google Chrome OS let us know your thoughts, we have created a forum topic just for that purpose. Let us know of other Chrome OS builds out there, or any questions you may have pertaining to this one.
