One of the major strength of Windows operating system is its high customizability – you can change how it looks and performs to suit your needs, choose which software you want to use for particular tasks and even set your preferred programs as the defaults. However, if you have to work on someone else’s PC, they will also have it set up according to their likes, which means you’ll have to bear their customizations and selection of applications. It is possible that it may be running the different version of Windows or even a different operating system.
The first solution to this problem that comes to mind is to access your PC remotely, but this means you have to leave your PC turned on and need a high-speed, reliable Internet connection at both ends. A second option is to clone your current Windows installation to a portable USB drive that you can boot into and run from anyplace. In this post, we show you how you can do just that.
Clone Windows 10 to a USB – Requirements
Windows 10 (and also Windows 8,) comes with a feature called Windows To Go, which lets you generate a portable version of the operating system you can operate directly from a USB drive. You just plug the portable drive into a USB port on any PC and boot into it. The first thing you need is an extra USB drive – but not any drive will do because there are some requirements. If you’re merely creating a new Windows To Go installation – that is, a clean version of Windows 10 – the drive you choose need to have at least 32GB of free space. You can use a USB pen drive for this. If, however, you’re cloning your existing Windows 10 installation – the one that is running on your PC with all its programs, customizations, preferences and settings – then you will need a much, much larger drive.
Our Windows installation, for example, is about 432GB in size and even if yours is smaller than this, it’s still likely to be too large for a primary, cheap USB memory stick. So, We recommend you to go with either 512 GB or 1 TB portable hard disk drive to fully utilize the cloning feature of Windows 10. Also, the drive you use should ideally support USB 3.0 or later, unless loading and use the operating system on it will be very slow and unpractical. Bear in mind, too, that not all USB 3.0 drives are similar – You should get the fastest you can find. This means paying a little more money, but the outlay will be well worth it. Ideally, you want your target drive to be around 20%-30% larger than your Windows installation partition.
Finally, you’ll need the free WinToUSB software, which creates the Windows To Go version of your OS on the USB drive. The best thing about this software is that it can hot clone your operating system, which means you can clone your OS while it is running. Before starting the cloning process, you need to carry out a little caretaking of your system.
Performing some cleaning process
First, you should spend some time clearing up as much space as possible. The smaller you can make your current installation of Windows, the faster and smoother it will be to clone it to a USB hard drive, so start by removing any programs you don’t require. A program such as Revo Uninstaller lets you list the items installed on your PC and delete them completely. Get rid of everything that you don’t need, then clean any clutter from your desktop and clear the Recycle Bin. If you have some huge files, such as videos, movies or ISO files, move them to another drive. You can take help of a tool such as CCleaner to go through your hard drive and remove additional clutter.
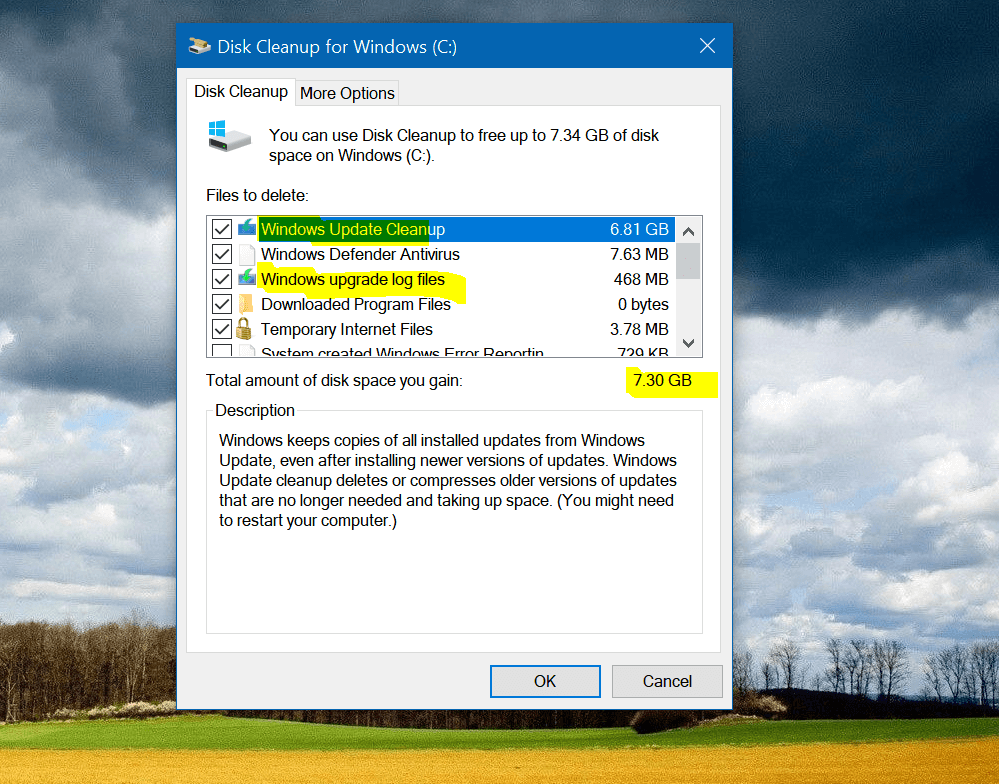
If you’ve recently upgraded Windows 10 to the April 2018 feature update, you might want to remove your previous Windows installation files because this can free up around 10GB of hard-drive space. There are two ways to do this. The first is to click Start and start typing disk cleanup. When it appears, right-click the Disk Clean-up entry and select Run as administrator. Make sure the partition containing Windows installation files is selected, then click OK. Click the Clean up system files button.
Select Windows installation partition once more and click the OK button again. This time you’ll also see the option – Windows Update Cleanup. This will include the files created by installing a feature Windows Update. Tick that box. Also, tick the Windows upgrade files, and then click OK to get rid of those backup files.
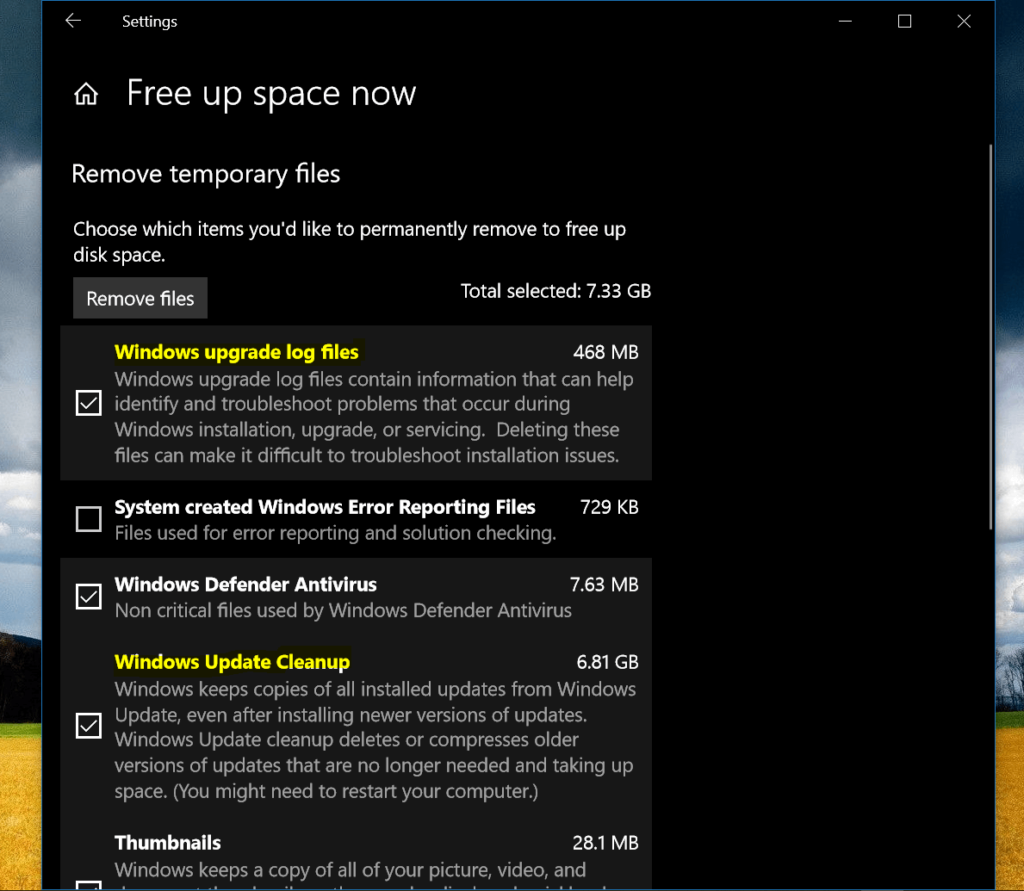
The alternative method is to open Settings and navigate to System, and then Storage. Under Storage Section, click Free up space now. Next, select the Windows Update Cleanup entry, then click Remove files at the top.
Formatting your target drive
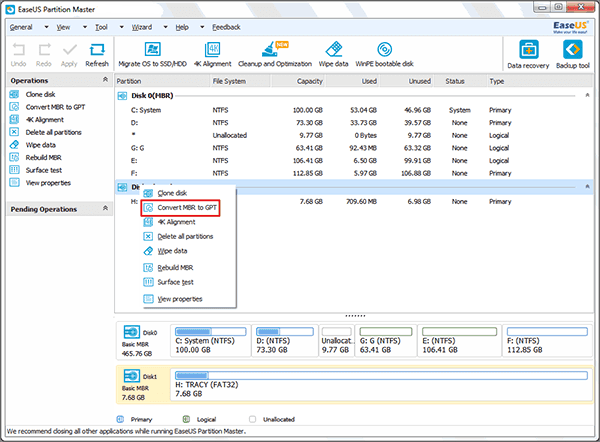
The drive that you’ll be writing Windows to needs to use the MBR (Master Boot Record) partition format and need to have system and boot partitions. There’s a good chance your drive will use GPT (GUID Partition Table) but changing it to MBR is quite straightforward. The easiest way to do this is to use the EaseUS Partition Master Free. Run the software, locate your drive, right-click it and select Convert GPT to MBR. Click the Apply button at the top to activate the task. If you don’t convert your drive to MBR, you won’t be able to copy Windows to it using WinToUSB.
The Cloning Process
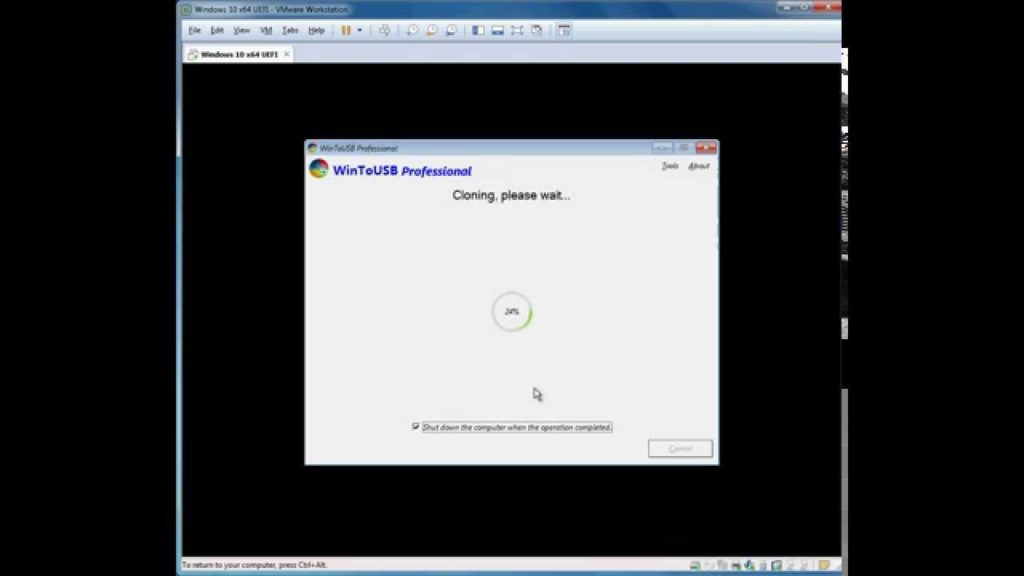
The cloning operation takes a long time, so for that reason, it might be a good idea to run the cloning process overnight. Exactly how much time you need to wait for its completion will depend on the size of the Windows installation you are copying and the speed of your USB drive. Ours took almost five hours to finish. By default, WinToUSB will shut down your PC once the cloning process completes.
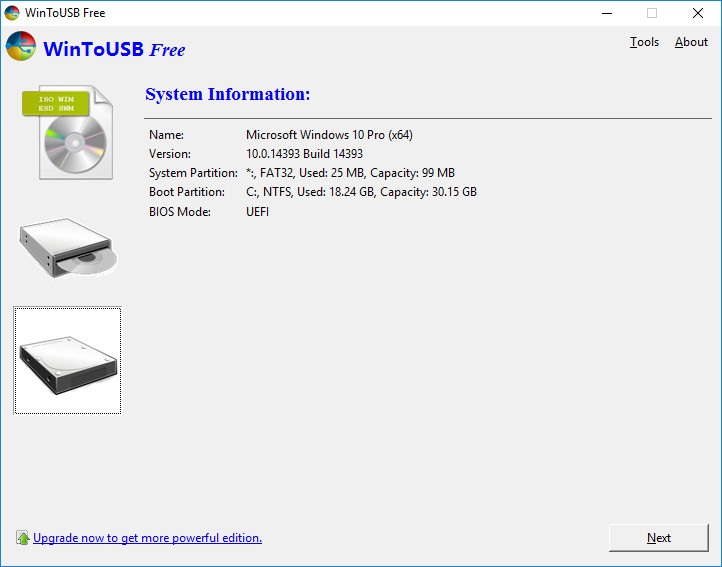
- Insert the USB drive that you need to install your Windows clone on into a USB 3.0 port and run WinToUSB program. Choose the Physical to USB option on the left. On the right side, the name of the OS you’re running, its version number, and system and boot-partition details are shown.
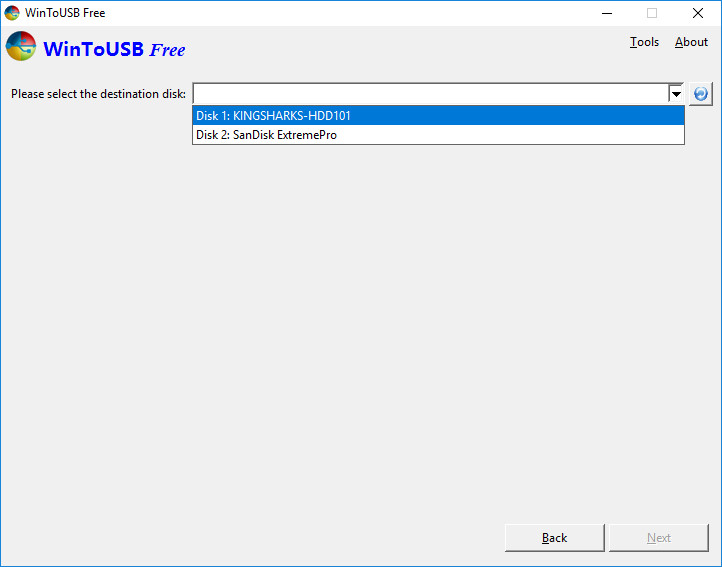
- Assuming the details are right, click the Next button. Select the target drive to copy Windows. If there’s more than one drive listed, make sure you pick the right one. You’ll be informed if there’s a problem – for instance, if the destination drive is too small.
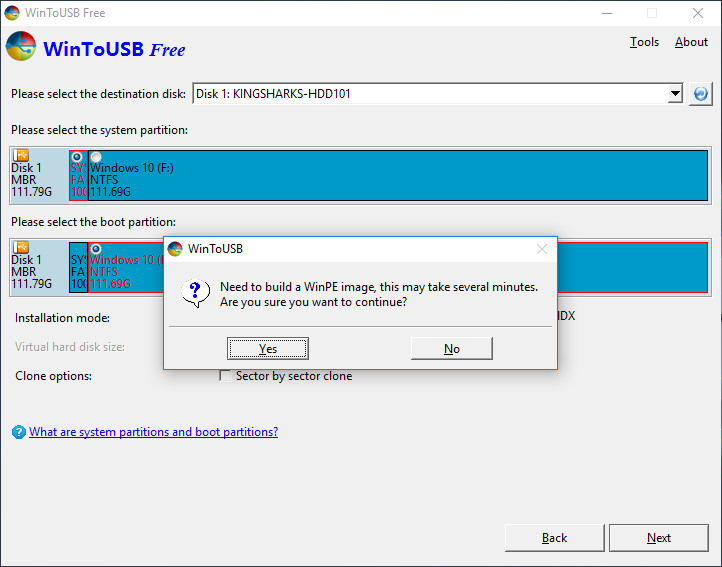
- Select the system partition and boot partition in the partition list. Click Next. You’ll be asked to build a WinPE image. Click Yes, wait while this happens, then click Yes to confirm you understand the process will wipe your data. Click Yes again, and your PC will reboot and begin the cloning process.
Booting from the portable drive
To use the live version of Windows, just plug it into any Computer and boot from it. The PC will need to be set to boot from the bootable USB drive. If it isn’t, you can either select the drive from the boot menu (by pressing whatever key is accepted for this task — typically F8, F11 or F12 key) or configure the boot sequence in the PC’s UEFI or BIOS firmware. Power up your PC and press the key required to enter setup (normally F2 or Del key), then look for a boot-order menu. Remember to save your changes to make it work.
Create a fresh portable version of Windows 10
If you prefer, you can use WinToUSB to build a fresh Windows 10 installation on a USB drive, then customize this according to your preferences. For this, you need an image of the operating system in ISO format, which you can obtain using Microsoft’s Media Creation Tool. Select the option to create installation media for another PC, click Next and select the required Windows edition, language, and architecture (32-bit or 64-bit). Everything needs to match with Windows license you have. Click Next and choose the ISO file as your installation media. Click Next again to download the ISO file. The ISO files are large, so it will take a while to finish, depending on your Internet connection speed.
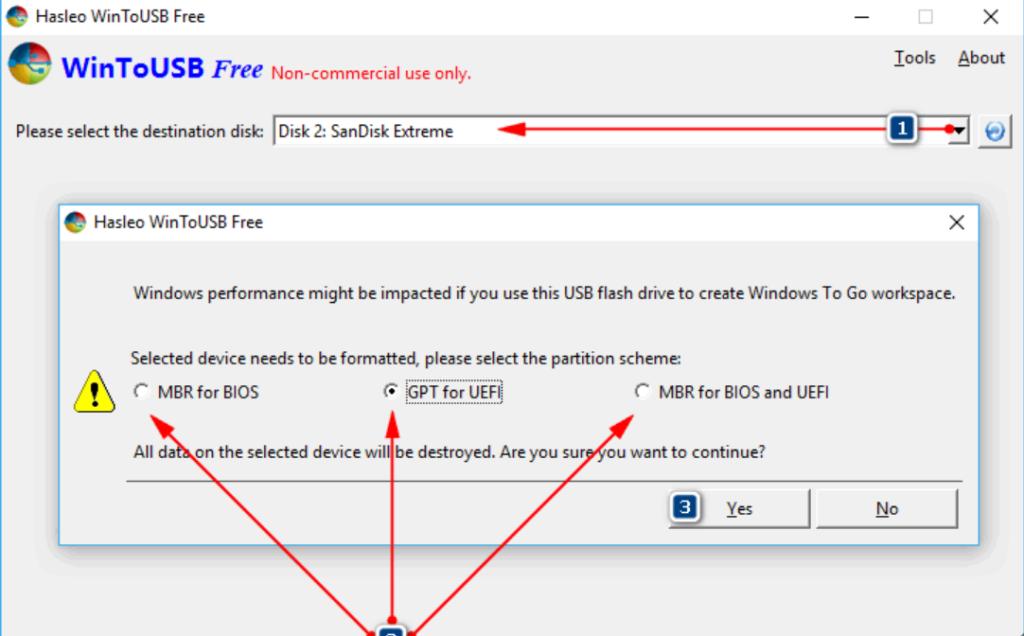
Once it’s downloaded, run WinToUSB, pick Image to USB option on the left and browse for the ISO in the Image File box. Choose the Windows version, click Next, and select a target drive. Before the process begins, you need to format the drive. Choose the format type you require (MBR for BIOS, GPT for UEFI or MBR for UEFI and BIOS ). Once that’s done, follow the steps and create your Windows To Go version of the operating system.