Among all the PC components, few need more attention and care than a hard drive. Over the years, We’ve all heard the advice to defragment disks and clean up junk files to keep our PC running smoothly. Honestly speaking, it does not matter how well you care for it; at some point, that drive is going to break. Sometimes you can overhear it coming, sometimes it happens abruptly in the middle of a project, and other times it just denies to boot one morning.
Whatever way your drive reaches its end, it’s a certainty you’ll see it happen if you use a PC long enough. Hard drives are complex devices. The hard drive’s fundamental segments are the magnetic platters containing the data and the head that reads and writes the data.
Those moving components are a big flaw in your hard drive. One ill-timed slip of a laptop, or an abrupt movement of a desktop cabinet, and the drive can be damaged beyond repair. Use your PC long enough, however, and the drive will break on its own. That’s why hard drives need more attention and monitoring than an SSD, which has no physical moving parts. They fail too, but usually not under similar situations.
While you can’t always foretell when or how your hard drive will die, you can take a few measures to see it coming.
Use SMART
The first tool for keeping checks on a hard drive is its Self-Monitoring, Analysis, Reporting Technology, or SMART, feature. This system is built into most recent hard drives and SSDs, and it’s intended to report when your drive is failing or facing issues. Drive manufacturers can take their own SMART procedures, but they usually cover similar performance points such as read error rates, hard disk temperature, mechanical shock, seek time performance, etc.
Most of the time, the SMART system operates in the background, but you can bring it to the front in several ways. The most straightforward way is to utilize the Windows command-line utility WMIC, which stands for Windows Management Instrumentation Command-line. This basic tool is simply based on SMART statistics. Start a Windows command prompt and enter the following command:
wmic diskdrive get model,status
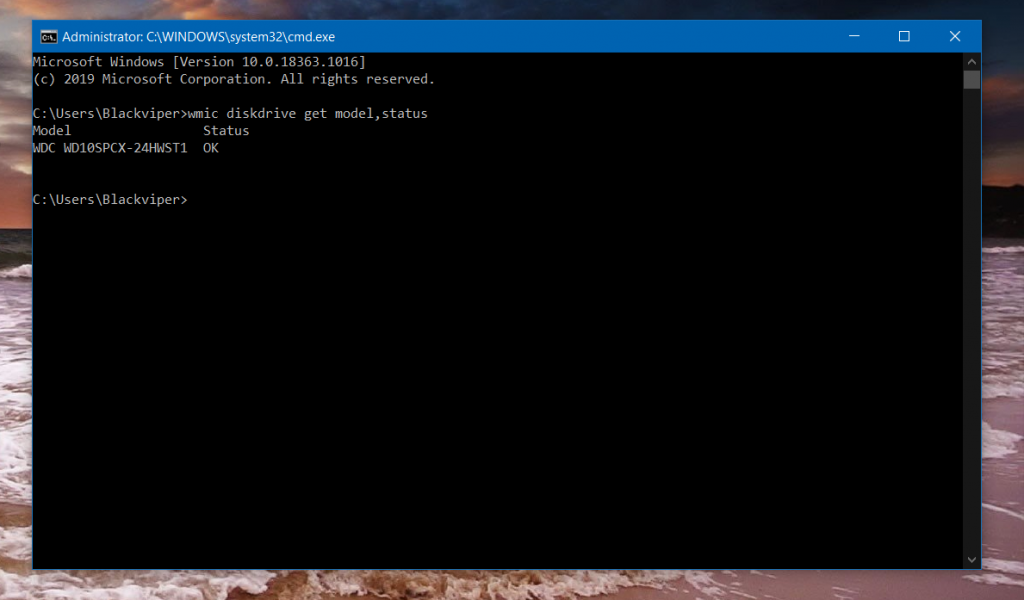
The outcome should look like the above image. It’s better to ask for the model and status so that you can determine instantly which drive is failing if a problem is listed. This is not so much a concern for laptops, but it’s crucial for desktops with multiple drives.
CrystalDisk Info
If you’d like something with slightly more detail, then another alternative is to use CrystalDisk Info. CDI is a free PC program that can reveal a lot of data about your disks, but the top area is probably sufficient for most users.
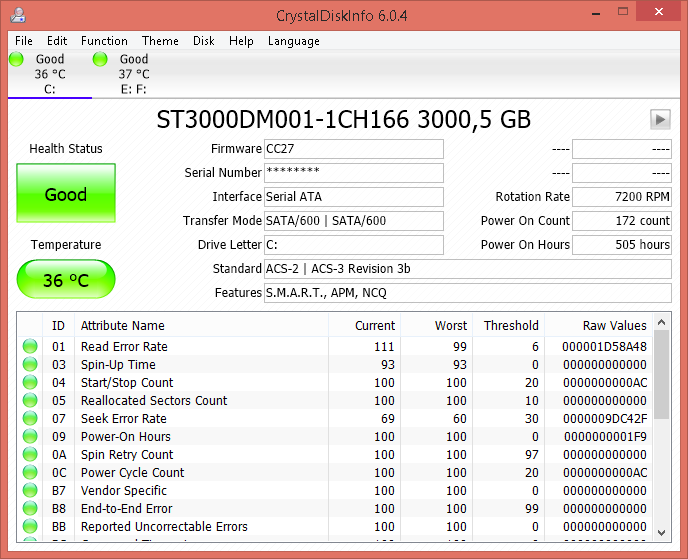
CDI presents a status for each drive using a color-coding scheme: Good (blue), Caution (yellow), Bad (red), and Unknown (gray). Most of the time, you should see a Good status, but it’s time to keep an eye on that drive if you see one of the others.
Beyond SMART
While SMART is a valuable tool for watching your drive’s health, you should also maintain an eye on how your drive functions and sounds. If you begin to detect a crunching noise originating from your PC, for example, that is most likely the hard drive. It possibly means it’s going to start malfunctioning soon.
Even if you don’t hear a grinding noise, your drive can cause unusual things such as constant crashes, a high amount of error messages, file or folder names with odd characters in them, or slow performance. Most of these problems are an obvious sign your drives are about to die, but not always.
First, check whether your storage device drivers are up to date. This is an excellent introductory step for any component, and it may improve your storage drive’s performance if you’re facing issues. If a driver update doesn’t serve, run Window’s built-in ‘chkdsk‘ (check disk) command-line utility.
‘Chkdsk’ works only with admin privileges. For this, search for command prompt in the Windows 10 search box, and then choose Run as administrator from the options as shown below.

To check all your drives’ status, type chkdsk for a read-only status. If you want it to repair problems, you need to run the check disk program with the /F or /R options. The /F option centers on fixing filesystem errors, while the /R option also looks for bad sectors on the disk—don’t use the /R option on an SSD as this selection is not built for solid-state drives. The /R option can take a long time to finish and needs a reboot, so only run that when you have the time. The /F option also requires a reboot to run but needs less time comparatively.
An example command might be chkdsk d: /r. This command tells the utility to check only your D drive. In this situation, the C: drive is a NvME SSD, and D: is the higher-capacity hard drive that needs servicing. Windows 10 automatically run the chkdsk in the background, so you may be warned of issues before you do a manual run of this utility.
To bypass the most severe effects of dying storage drives, make sure you’re doing routine backups. The most suitable option is to apply something that saves multiple historical states of your data, such as Windows’ built-in File History.
It’s also an excellent approach to use a cloud backup service, so you have a third copy of your offsite data. An alternative choice would be to have two hard drives doing File History backups and keeping one offsite, with frequent swaps to keep each drive as current as possible.
Once you start noticing severe problematic drive faults that can’t be repaired with check disk, try to replace the hard drive as soon as possible. If the errors can be corrected, you can probably use it for a while, but it’s still a good idea to substitute it and avoid further problems.